
Building my own PwnPad Community for fun and for less than $300

More than 1 year ago, i have posted an entry about a hardware for doing pentesting. It was the PwnPlug by Pwnie Express folks. Since, the guys have improved a lot their hardware and released new stuff. One toy that caught my attention was the PwnPad.
PwnPad is the art of turning a Tablet, actually Google Nexus 7 tablet, into a pentesting machine.

Here is the commercial PwnPad description as it comes in PwnieExpress website
A commercial grade penetration testing tablet providing unprecedented ease of use in evaluating wired and wireless networks. The sleek form factor of the Pwn Pad makes it an ideal product choice when on the road or conducting a company or agency walk-through. This high-speed, lightweight device, featuring extended battery life and 7” of screen real estate, offers pentesters an alternative never known before.
- Android OS 4.2 and Ubuntu 12.04
- One-touch Pentesting
- Large screen, Powerful battery
- OSS-Based Pentesting Toolkit
- Long Range Wireless & Bluetooth
Included Accessories:
- TP-Link High-gain 802.11b/g/n USB wireless
- Sena High-gain USB Bluetooth
- USB-Ethernet adapter (for wired networks)
- USB OTG cable (for USB host-mode)
- Protective tablet case
BUT, there is always a BUT. The price is a bit higher ($895.00 USD) but justified: The amount of work, all the effort, the innovative approach etc. And it deserved it. Besides, the folks at PwnieExpress provided a less costy way to build your own pwnpad. In fact, the community release of their software images are freely downloadable.
Building your own PwnPad is possible. Despite my legendary laziness, i did it. So you can. And here is how ..
Needed Hardware
The full original list provided by PwnieExpress Team is here. So i rely on it to understand the process before shooting my Nexus 7.
When i started my installation here is the list of the hardware i had.
- Backtrack 5.2 Linux. PwnieExpress recommend Ubuntu 12.04. But with some tricks you can rely on BT.
- Nexus 7 Tablet with 32 G Wifi + Mobile Data. Beware, the installer for now supports only this model.
- A micro USB OTG to USB 2.0 adapter. Actually, i bought one from Amazon for 5$ ( Here is the one i got KooPower TM Micro USB OTG )
- Trendnet TU2-ET100 Adaptateur USB 2.0 Ethernet 10/100 for almost 20$ (here is the link)
- A 8 GB USB key formatted with NTFS. I used one i got at home and formatted to NTFS.
- A TP – Link TL – WN 722 N USB adapter for almost 15$ . For WiFi hacking. But i did not received yet.(so no injection for me now)
- Sena High-gain USB Bluetooth. I love hacking with Bluetooth especially with all those dorks in subway with their loud music wireless earphones. But did not receive mine yet. The Sena is a bit costy (around 50$)
- Jammy Lizard Aluminium Bluetooth Keyboard bought on Amazon for 25$. When you have to do something, do it with some class 😉

Google Nexus 7 Mobile + Bluetooth keyboard (before pwning)

micro USB OTG to USB 2.0 adapter

Trendnet TU2-ET100 Adaptateur USB 2.0 Ethernet 10/100
Preparing Software
Backtrack 5.x with Ubuntu 12.04 source lists (if you have an Ubuntu 12.04, skip this)
- Add the list of Ubuntu 12.04 repositories from here http://mixeduperic.com/downloads/org-files/ubuntu/etcaptsourceslist-ubuntu-12041-default-file.html to your BT /etc/apt/sources.list (The list provided works for me. You can add only needed repositories)
- Add GPG keys sudo apt-key adv –keyserver keyserver.ubuntu.com –recv-keys 437D05B5 3E5C1192 .
- Add repository for Android dependencies and tools. Otherwise, it won’t work (the package android-tools-adb is mandatory)
deb http://ppa.launchpad.net/
phablet-team/tools/ubuntu precise main deb-src http://ppa.launchpad.net/ phablet-team/tools/ubuntu precise main sudo apt-get update - I got an APT::Cache-Limit issue. So, i fixed this by increasing the value:
(1) add this line APT::Cache-Limit "100000000"; to/etc/apt/apt.conf.d/70debconf
(2) sudo apt-get clean && sudo apt-get update --fix-missing
USB dongle NTFS Formatted
Any 8GB USB dongle could be used for the installation. As for myself, i used a very common USB key that i formatted with my Win XP. Lifehacker folks gave the method. So follow it !
It worked for me.
Installation Steps
PS : Stick the instructions in front of you http://cdn.shopify.com/s/files/1/0159/6468/files/PwnPadCommunityEditionInstallationGuide.pdf
1 – Starting the extract script
Just follow the instructions (Extract the package & run the installer script) given with http://cdn.shopify.com/s/files/1/0159/6468/files/PwnPadCommunityEditionInstallationGuide.pdf
While the script was running, i was prompted to confirm the android package. Do not panic. Just say yes. Here are the warnings sample :W: GPG error: http://ppa.launchpad.net precise Release: The following signatures couldn’t be verified because the public key is not available: NO_PUBKEY 5C5364B55E51A24C
WARNING: The following packages cannot be authenticated!
android-tools-adb android-tools-fastboot
Install these packages without verification [y/N]? y
2 – Everything is good.
If everything worked as expected, you should be prompted to supply the USB location
Enter the device name of the locally-attached USB flash drive containing the TWRP folder (in /media/) Example: usb1: 144E6FEE4E6FC758
_____ ___ _ ___ ___ _____ _____ ___ ___ ___ ___
| _ \ \ / / \| |_ _| __| | __\ \/ / _ \ _ \ __/ __/ __|
| _/\ \/\/ /| .` || || _| | _| > <| _/ / _|\__ \__ \
|_| \_/\_/ |_|\_|___|___| |___/_/\_\_| |_|_\___|___/___/
=== Pwn Pad Installer Release 4.10.2013 ===
A Mobile Pentesting platform by PwnieExpress.com
Please review the Pwn Pad Installation Guide before proceeding:
http://pwnieexpress.com/pages/
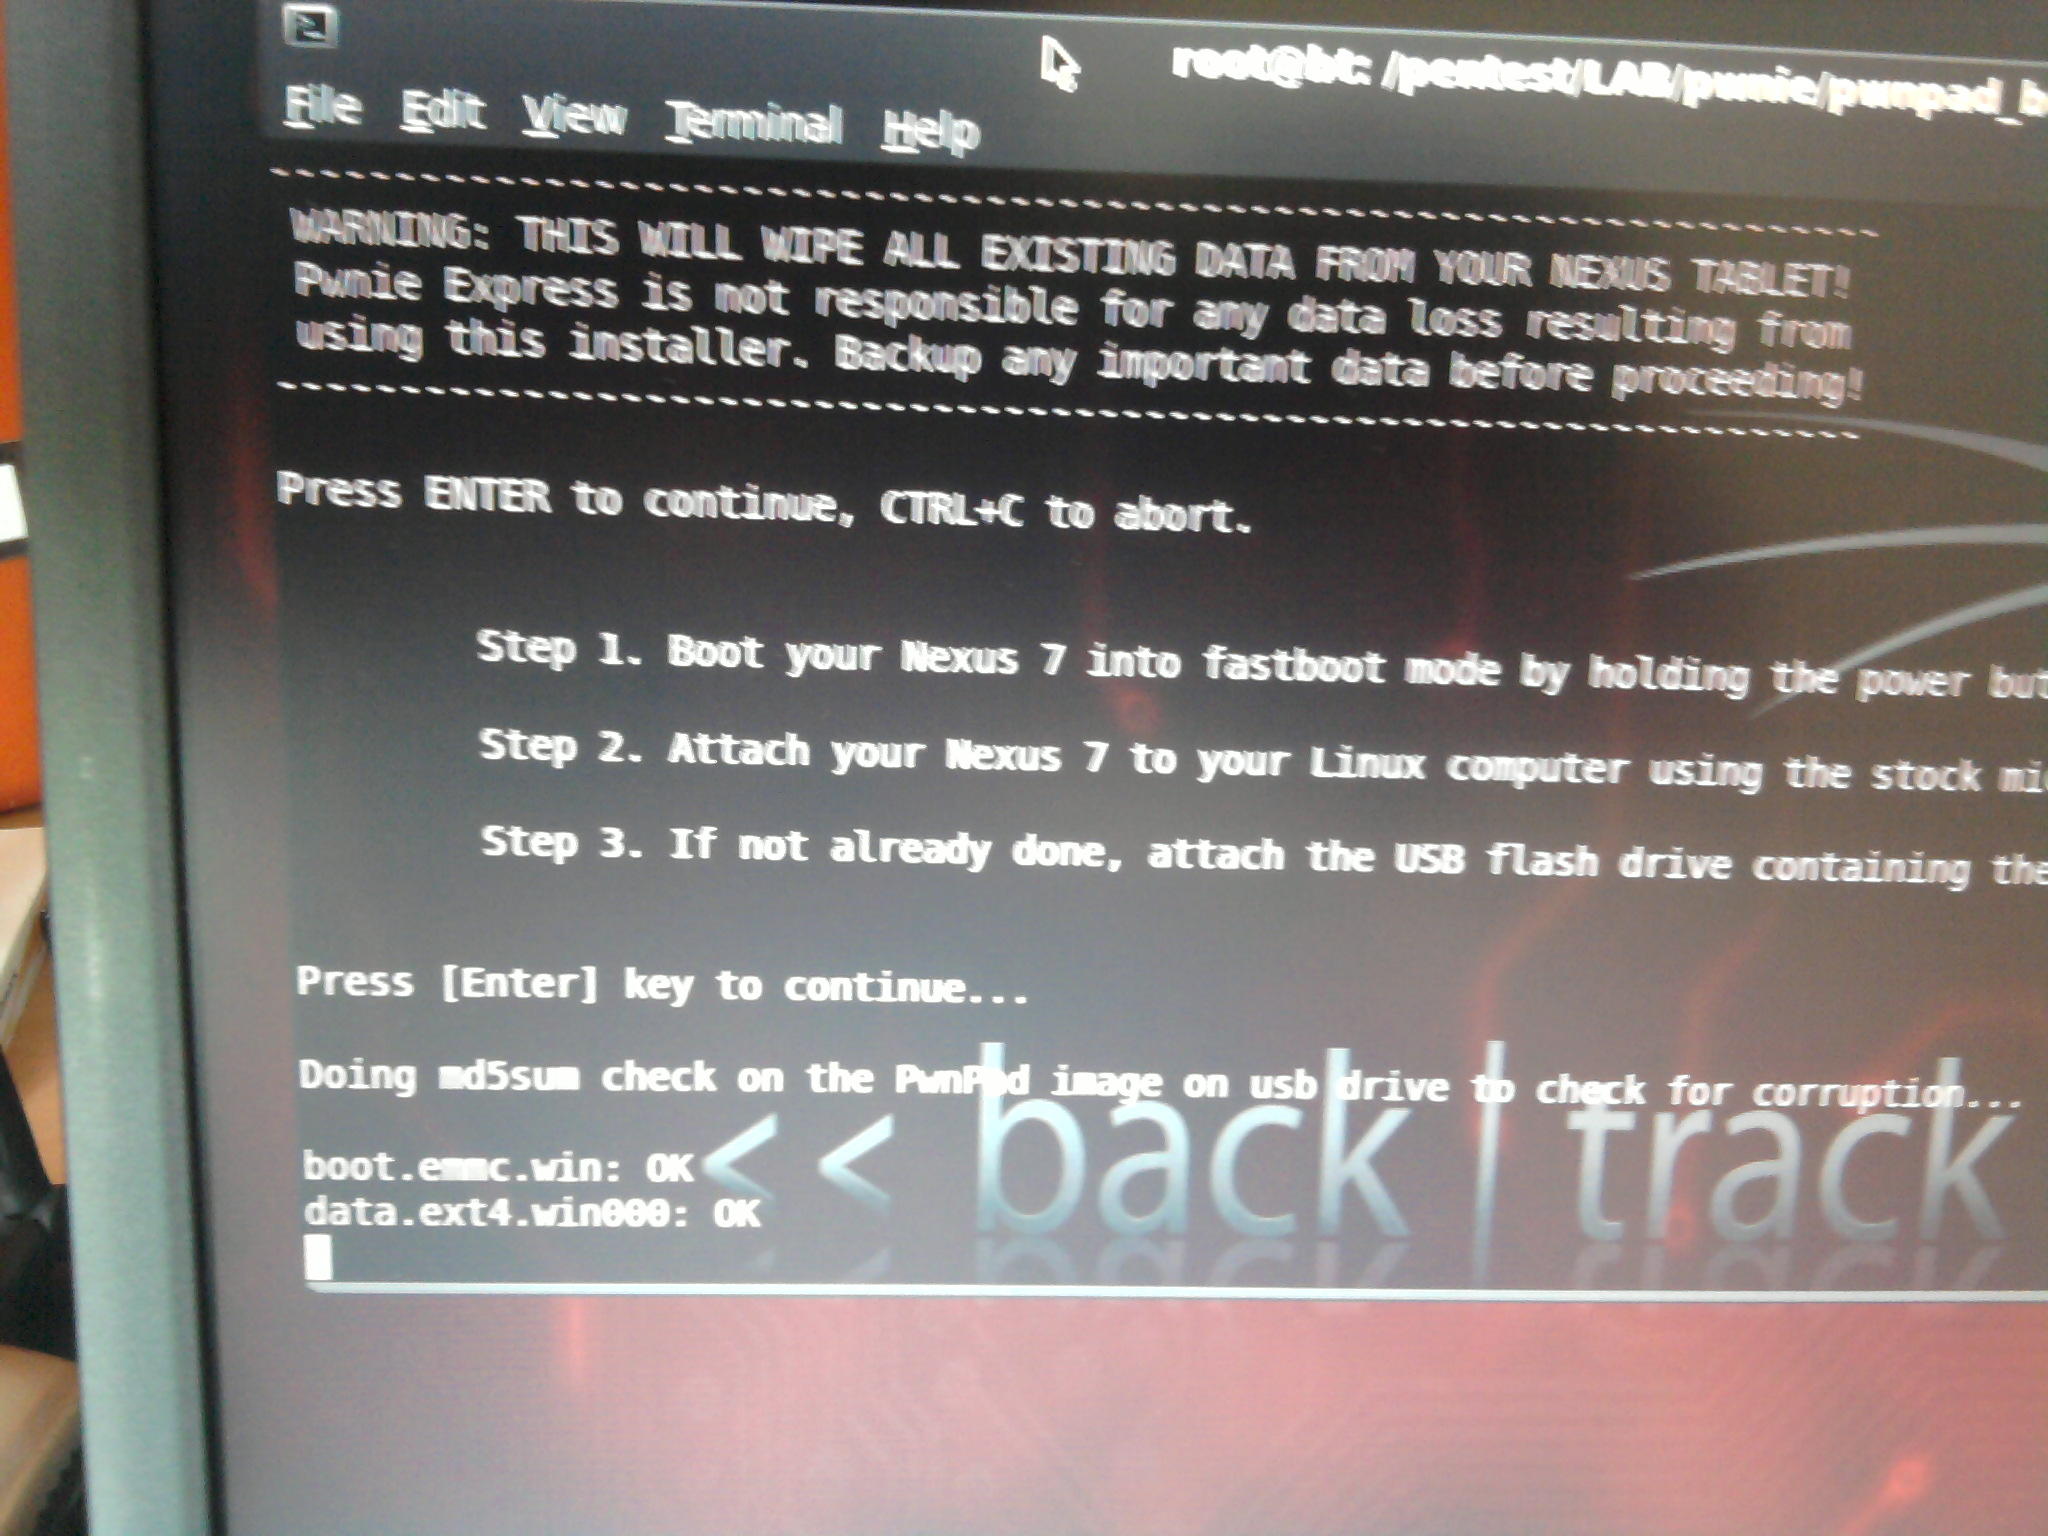
WARNING: THIS WILL WIPE ALL EXISTING DATA FROM YOUR NEXUS TABLET!
Pwnie Express is not responsible for any data loss resulting from
using this installer. Backup any important data before proceeding!
——————————
data.ext4.win000: OK
data.ext4.win001: OK
system.ext4.win: OKmd5 checksum passed. Proceeding.Unlocking devicePlease hit the power button once on the device to select YES
(bootloader) erasing userdata…
(bootloader) erasing userdata done
(bootloader) erasing cache…
(bootloader) erasing cache done
(bootloader) unlocking…
(bootloader) Bootloader is unlocked now.
OKAY [ 80.531s]
finished. total time: 80.531s
erasing ‘userdata’…
OKAY [ 4.911s]
formatting ‘userdata’ partition…
Creating filesystem with parameters:
Size: 30063722496
Block size: 4096
Blocks per group: 32768
Inodes per group: 8192
Inode size: 256
Journal blocks: 32768
Label:
Blocks: 7339776
Block groups: 224
Reserved block group size: 1024
Created filesystem with 11/1835008 inodes and 159204/7339776 blocks
sending ‘userdata’ (139157 KB)…
writing ‘userdata’…
OKAY [ 31.291s]
finished. total time: 36.202s
erasing ‘cache’…
OKAY [ 0.084s]
formatting ‘cache’ partition…
Creating filesystem with parameters:
Size: 464519168
Block size: 4096
Blocks per group: 32768
Inodes per group: 7088
Inode size: 256
Journal blocks: 1772
Label:
Blocks: 113408
Block groups: 4
Reserved block group size: 31
Created filesystem with 11/28352 inodes and 3654/113408 blocks
sending ‘cache’ (9052 KB)…
writing ‘cache’…
OKAY [ 1.843s]
finished. total time: 1.927s
Booting into TWRP
downloading ‘boot.img’…
OKAY [ 0.951s]
booting…
OKAY [ 0.019s]
finished. total time: 0.970s
Once device has booted into the “Team Win Recovery Project” screen, do the following in this order:
1. Disconnect micro-USB cable from the Nexus
2. SAFELY Remove USB drive from your Linux computer and attach it to Nexus via micro-USB OTG cable.
3. Tap “Restore” and select “Use External SD” (top left). Hit the back button, then go back to “Restore”
4. Select “PwnPadv0a”, then “Swipe to Restore”

5. Once complete tap “Reboot System” and hold down the Volume-Down button while booting
5. Once device is back in FASTBOOT mode, reconnect the Nexus to your Linux computer using the stock micro-USB cable that came with the Nexus. Then, AND ONLY THEN, press ENTER to continue.

Press [Enter] key to continue…
Press [Enter] key to continue…
erasing ‘boot’…
OKAY [ 0.032s]
finished. total time: 0.032s
sending ‘boot’ (4942 KB)…
OKAY [ 0.637s]
writing ‘boot’…
OKAY [ 0.200s]
finished. total time: 0.837s
rebooting…
finished. total time: 0.020s
Device Finished!

Testing the pwnpad
Upon rebooting, you’ll be amazed by the desktop full of the tools needed for performing pentesting. I tested everything .. almost everything except WiFi pentesting, did not received yet my WiFi Dongle for injection.
- TP-Link High-gain 802.11b/g/n USB wireless
- Sena High-gain USB Bluetooth
to test the awesomeness of pwnpad 🙂
I will post a more detailed blog about pwnpad cool stuff. Until then, PwnieExpress is full of material and great posts.

using the bluetooth keyboard.
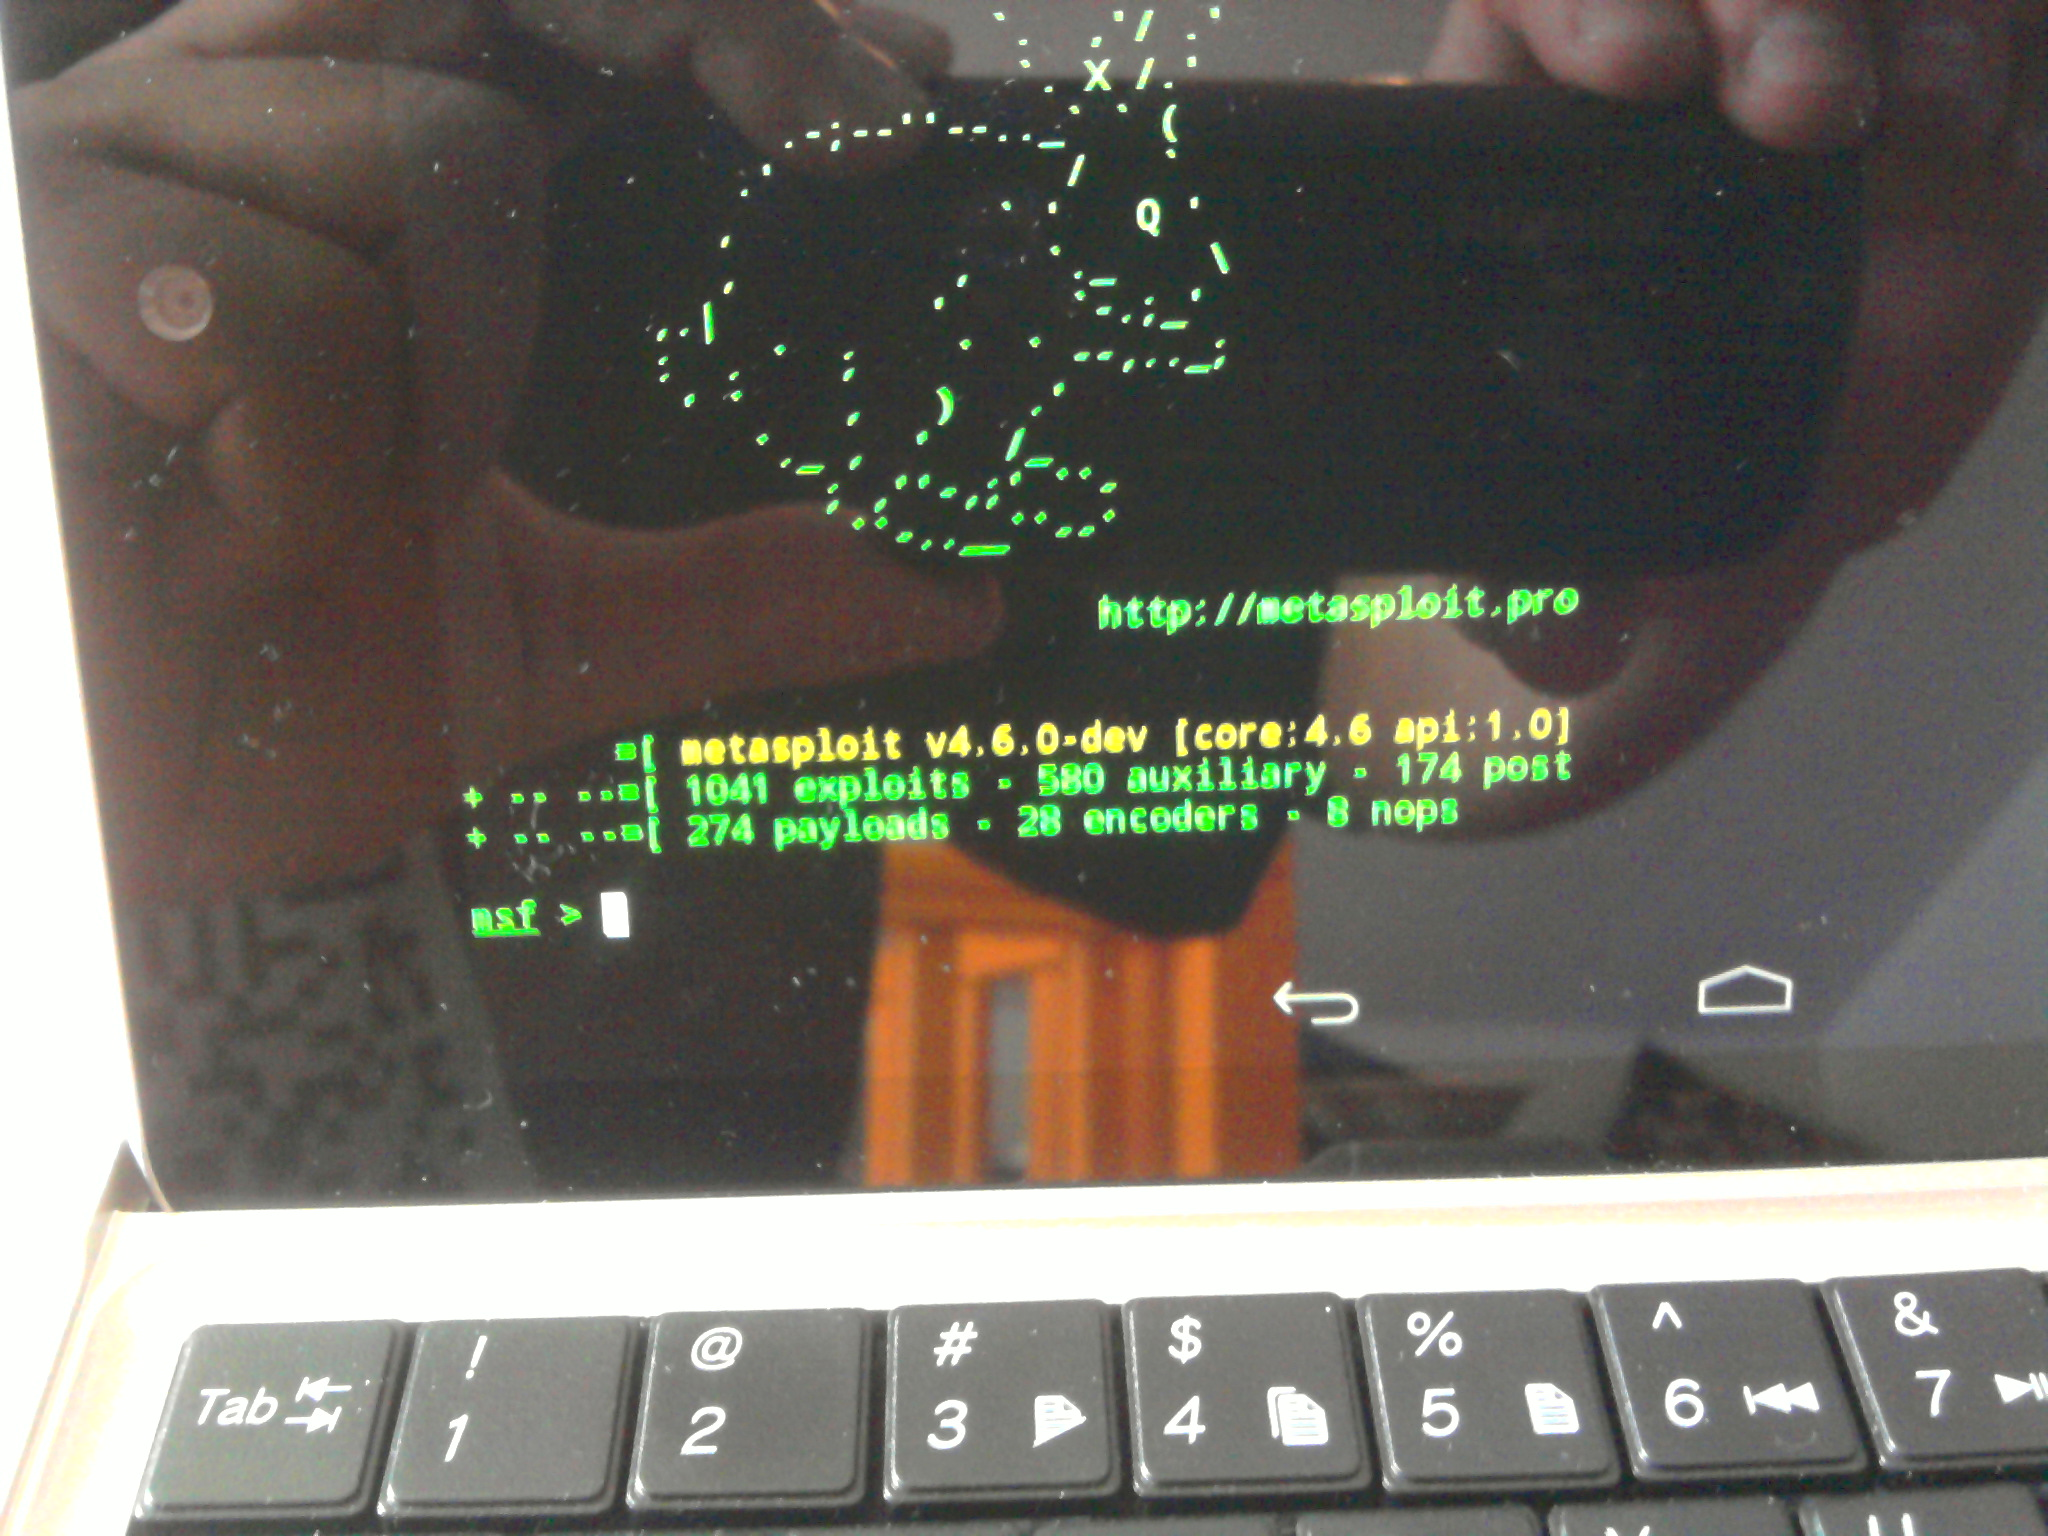
Metasploit loaded …
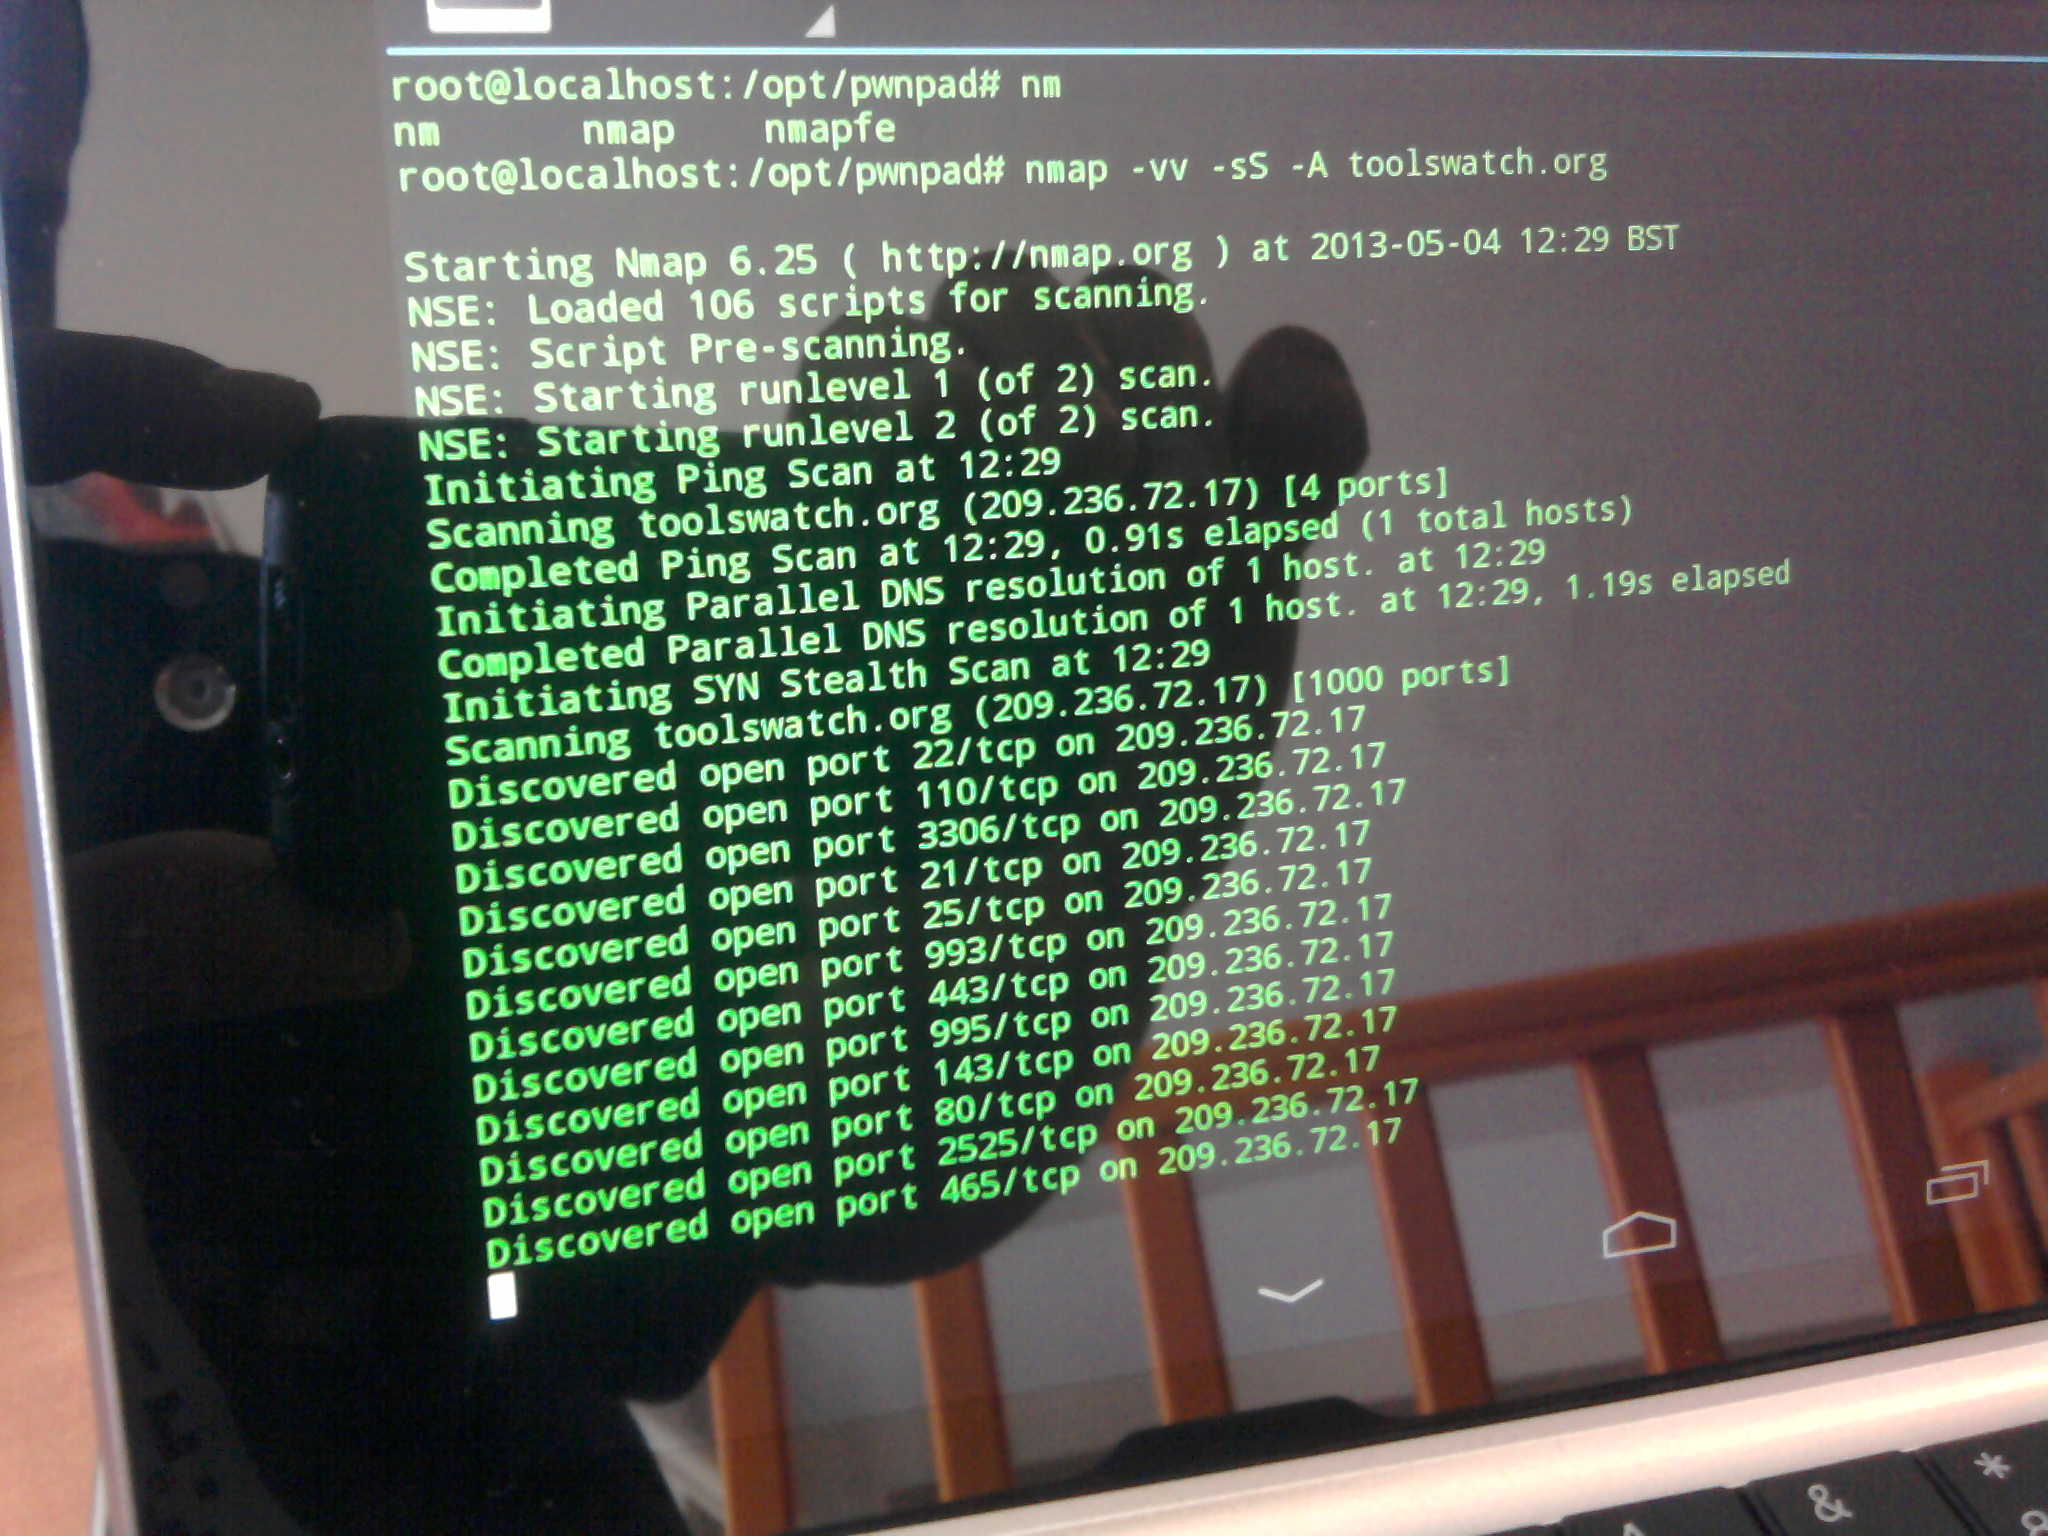
nmap in action …
Mishap
I tried to update metasploit. Everything worked well until the restart. Metasploit was expecting the Bundler Gem. I retrieved it and launched the install (bundle install). One of the packages (factory_girl) expected a newest ruby version. Maybe this post could help but i was too excited to play with the toy.
My version of metasploit was then screwed up. Do not panic. There is a little trick to recover metasploit or at least how i circumvent this issue to restore the original version that comes with pwnpad.
The pwnpad packages (data.ext4.win000 and data.ext4.win001) are archives files. So gunzip/untar them and browse to /ubuntu/local/opt/. Then generated a new .tar file that i transfered using the USB key.
Into the nexus, i removed the repository metasploit (rm -rf /opt/metasploit-framework) and untar the fresh version. It worked 🙂
update !!
Here is what jcran from pwnieexpress sent about this issue (see the comments)
” .. make sure your ruby is configured for 1.9.3, then run msfupdate with the following:
update-alternatives –query ruby
update-alternatives –set ruby1.9
apt-get –purge remove libruby1.8 ruby1.8 ruby1.8-dev rubygems1.8
msfupdate


